How to Unlock Bootloader of Android Device With KingoRoot
Users
who own an Android device can't stop from tweaking, changing,
customizing, and optimizing the internal system and OS, such as install a
new custom ROM, backup system data, customize Android device, root the device and so on. Before any tweaks and tricks, the first thing an user should do is to unlock the bootloader of Android device.


What Is a Bootloader?
An
Android device consists of several pieces of software, which include
the bootloader, radio, recovery, and system. The bootloader is the first
piece of software that is run when your device turns on. It decides
whether to load the recovery, or load Android and the radio. It packages
the instructions to boot operating system kernal and most of them are
specifically designed to run their own debugging or modification
environment.
How to Unlock an Android Device?
Most
Android bootloaders are locked as well as encrypted by developers in
order to make sure users stick to their Android OS version. Whether you
are allowed to unlock the bootloader depends on the manufacturer of the
device, the model and even the carrier. Nexus phones are all allowed to
be unlocked, and many phones from Motorolar and HTC as well as some
other phones allow users to unlock through a similar process. However,
some device can never unlock its bootloader. If an user who want to root
their Android device or flash a new custom ROM, he/she had to unlock
the bootloader. KingoRoot step by step guide users how to unlock the
bootloader of an unlockable Android device.
Step 1: Backup important data
The
unlocking process will sweep of all the data of Android. So it is
important to backup any photos, videos, app data or other files on your
device to a computer, a SD card or the online cloud. Backup everything
you want to keep, then continue to the next step.
Step 2: Free Download KingoRoot
KingoRoot is the best and easiest root tool for free. Here KingoRoot is not used for rooting but an alternative to Android SDK and
USB driver. The KingoRoot includes the Android SDK and will download
the USB driver of your device automatically once connected to the PC.


- Free download the KingoRoot to the PC.
- Install the KingoRoot.
- Connect the device to the PC via an USB cable.
- Enable USB debugging.
- Click Menu button to enter into App drawer.
- Go to "Settings".
- Scroll down to the bottom and tap "About phone" or "About tablet".
- Scroll down to the bottom of the "About phone" and locate the "Build Number" field.
- Click Menu button to enter into APP Drawer.
- Tap the Build number field seven times to enable Developer Options. Tap a few times and you'll see a countdown that reads "You are now 3 steps away from being a developer."
- When you are done, you'll see the message "You are now a developer!".
- Tap the Back button and you'll see the Developer options menu under System on your Settings screen.
- Go to Settings>Developer Options>USB Debugging. Tap the USB Debugging checkbox.
- Find the icon of KingoRoot and launch it with the device connecting to the PC. After launching the KingoRoot, the PC will download the USB driver of your device automatically.
- Find the folder of KingoRoot where you install it, double click to open the folder of "Kingo ROOT". Then open the folder of "tools" under the folder of "Kingo ROOT".
- Input the letters "cmd" in the "address bar", and enter.
Once
you have connected you device to the PC, the device will show the
option of "USB debugging", then just enable the USB debugging. If you
fail to connect you device to PC, please refer to Device Not Connected.

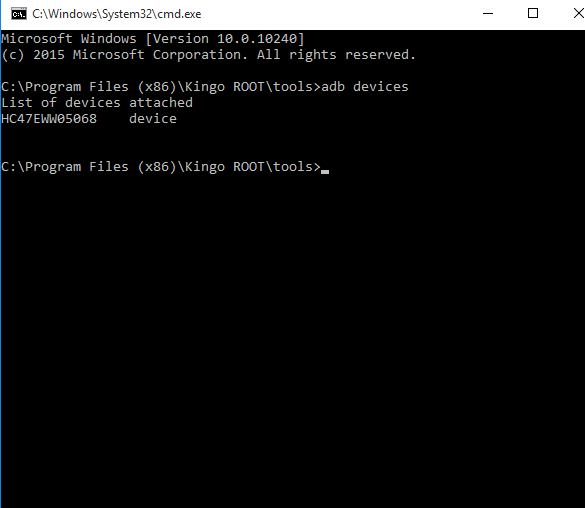
- The PC will pop-up a Command Prompt window, then run the command:
adb devices
If
it shows a serial number, your device is recognized and you can
continue with the process. Otherwise, ensure you’ve performed the above
steps correctly.
Step 3: Get an Unlock Key.
There
is no need for a nexus device, if you own one, you can just skip this
step. If you own another unlockable device such as HTC or Motorola.
- Head to your manufacturer's bootloader unlocking page ( For example HTC and Motorola ), create an account.
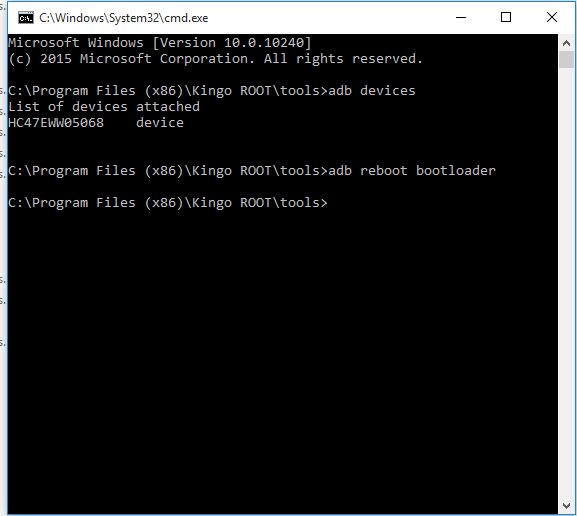
- Run the command:
adb reboot bootloaderin the Command Prompt window. The device will boot into fastboot mode. Always keep the connection. - Use
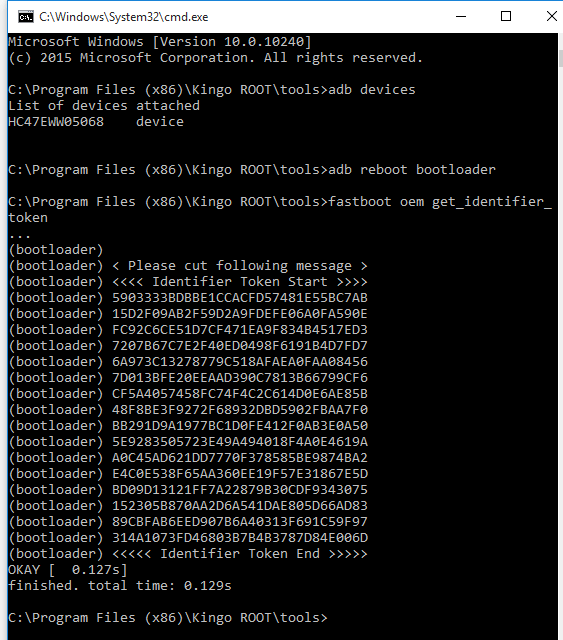
the Command Prompt window to retrieve your unlock key as described by
your manufacturer. If you own a Motorola device run the command:
fastboot oem get_unlock_data, HTC run the command:fastboot oem get_identifier_token. - Select the token which is spit out by the Command Prompt window and copy and paste it into the applicable box of the form on your manufacturer's website without any spaces.
- Submit the form and wait for an email with a key or file that you will use in the next step.
Step 4: Unlock your bootloader of your Android device.
Here
comes to perform the unlocking process. If you haven't interrupted the
connection and your phone still in the fastboot mode ( If your device
isn't in the fastboot, then repeat the step 2 or just hold the "Volume
Down" and "Power" button for 10 seconds before releasing in order to
make the device being in the fastboot mode. ):
- Run the command:
fastboot oem unlockfor most Nexus devices,fastboot flashing unlockfor Nexus 5X or 6P. - For a non-Nexus device, go to the manufacturer official website for command. For example, command
fastboot oem unlock UNIQUE_KEYfor Motorola Devices, using the unique key from email you received of Step 3. HTC devices run commandfastboot oem unlocktoken Unlock_code.bin, using the Unlock_code.bin file you received from HTC email. - Use the "Volume" keys to confirm if you are sure to unlock the bootloader.
- Reboot your device by running command
fastboot rebootor using the "Volume" buttons to reboot.
The
device will show a message at boot stating that your bootloader is
unlocked. With an unlocked bootloader you will be allowed to root your Android, flash a custom recovery or install a custom ROM.